How to Integrate Netlify CMS with Fastpages
Tutorial to use Netlify CMS with Fastpages
1 Introduction
Fastpages is a wonderful piece of technology created by FastAI team which enables painless blogging with Jupyter Notebook, Word documents or Markdown. I have been hacking around FastPages to see how far I can strech it to enable blogging with other tools I am interested in learning. I have already blogged about integrating Fastpages with Oberservable notebook, a great place to learn d3 and web visualization; and org mode which is an incredible powerful tool for various scenarios including writing, literate programming or GTD. These workflow are incredibly easy once everything is setup; nevertheless these are all expert level workflows for writing which requires personnel who are little bit adept in technology. Even when you are using a word file, you need to have a dedicated github account, need to upload the file and write commit message.Data Scientists are usually well versed in these, but for people not coming from programming background, these thing can be a bit overwhelming initially. A Content Management System in this regard is excellent tool for focussing on writing and editing rather than programming concepts. In this context, I want to experiment with integration of the same and quickly examine the new workflows possible for content generation.
2 Netlify CMS
Usually CMS are associated with frameworks like wordpress , where content is backed up with a database. For static sites there are no databases. Now in this context, editing workflows are usually driven by structure or organization of your folders/ content . This is sometime also referred to as your content model or data model. Netlify CMS provide workflow to manage the same quite easily from a web interface. So enough chit chat lets get started with some code and steps to implement the same
3 So what do we need to do?
I take inspiration from Netlify tutorial to migrate an existing website. Since Fastpages is based on jekyll framework. We will follow the workflow for the same
- First thing we need to do is to create an admin folder in root location ("/") of our project directory.
-
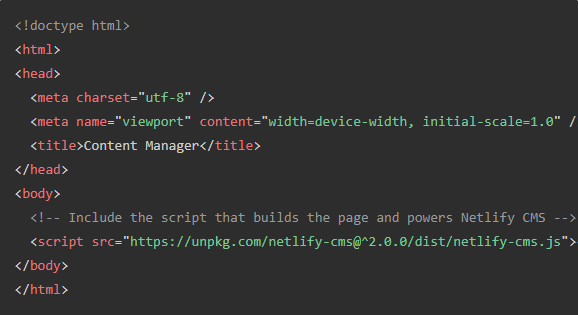
Next add two files to admin folder with following contnet
- index.html

Index.html - config.html
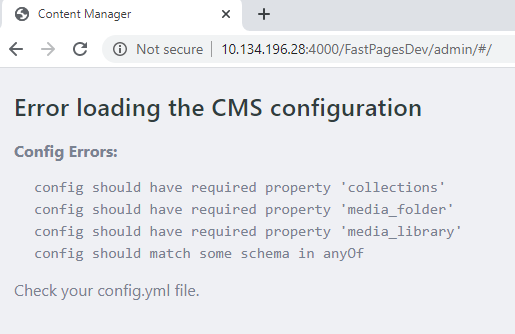
backend: name: git-gateway branch: master # Branch to update (optional; defaults to master) publish_mode: editorial_workflow media_folder: images collections: - name: "post" # Used in routes, e.g., /admin/collections/blog label: "Post" # Used in the UI folder: "_posts" # The path to the folder where the documents are stored create: true # Allow users to create new documents in this collection slug: "---" # Filename template, e.g., YYYY-MM-DD-title.md fields: # The fields for each document, usually in front matter - {label: "Layout", name: "layout", widget: "hidden", default: "post"} - {label: "Title", name: "title", widget: "string"} - {label: "Publish Date", name: "date", widget: "datetime"} - {label: "Categories", name: "categories", widget: "list"} - {label: "Body", name: "body", widget: "markdown"} - name: "page" # Used in routes, e.g., /admin/collections/pages label: "Page" # Used in the UI folder: "_pages" # The path to the folder where the documents are stored create: true # Allow users to create new documents in this collection slug: "" # Filename template, e.g.,title.md fields: # The fields for each document, usually in front matter - {label: "Layout", name: "layout", widget: "hidden", default: "page"} - {label: "Title", name: "title", widget: "string"} - {label: "Permalink", name: "permalink", widget: "string"} - {label: "Body", name: "body", widget: "markdown"} - Tutorial goes into a lot of detail about configuring the config.yml correctly .However I always believe in doing things in small pieces. Making some changes and then looking at the output to figure out what has happened. So now what I do is commit the code. Based on the description presented, we should have an url with admin page in the rendered site. So let's go there and examine the output.

CMS Error
The link indicates our configuration is incomplete and gives us recommendation of things that are require fixing.